Quantcast
Channel: Cook like Priya
Viewing all 285 articles
Browse latest View live

Sukku Kaapi | Ginger Coffee | Hot Indian Drink recipe

$
0
0

Sukku Kaapi is one of my comfort drinks when I am down with fever or cold or even during rainy days. It has a punch of ginger that gives the drink a good punch. Soothing in nature dry ginger is well known for its medicinal properties one such goodness is blood circulation with helps in skin and hair health. Since dry ginger has a strong taste adding too much of it can cause heart burn for some. So take care while taking this drink and a little goes a long way.

How do you like the props in the pictures? I used Amma's tea set with her personal journal and her glasses ;-) 


SUKKU KAAPI RECIPE

Recipe Source - Own
Serves - 2 cups 
Prep time - 10 mins

To make sukku podi 

Dry roast 1 medium piece of Dry ginger in low flame on a pan for 1 minute, switch off and let it cool down. Once it is cool grind to a fine powder. You can do a large batch too and store in a container

To make Sukku Kaapi

Ingredients

Sukku podi/ dry ginger powder - 1 and  half tsp
Cardamom powder - a generous pinch
Palm candy/ Palm jaggery - 3 tsp (I used palm candy)
Hot Milk - 1 and 1/2 cup
Water - 1/4 cup

Method

Boil water in a milk pan and when the water is bubbling add the sukku podi/ dry ginger podi and when it boils for 2 minutes add the palm candy/ palm jaggery and wait for it to dissolve. Now add the hot milk to the pan and mix well, add cardamom powder if using. 

Serve hot in teacups and enjoy along with biscuits


Cooks Wisdom

- Dont add more than a tsp of ginger powder for 2 cups milk, as it can cause heartburn for some, a little goes a long way
- Add hot milk to the ginger syrup and not cold as the milk can split
- Serve hot and as soon as the sukku kappi is done.
- adding cardamom powder gives a sweet taste to the drink
- You can skip palm candy/ palm jaggery and use sugar instead

Rava Kesari | Ananda Bhavan Rava Kesari Recipe | Sooji Halwa | Indian Sweet Recipe

$
0
0

Rava Kesari is one famous and quick to do South Indian sweet. There are so many versions of kesari online and I am sure each one of us have a method to make this sweet. But of all recipes and versions I have always been this big fan of Adyar Ananda Bhavan Kesari, if you live in South India I recommend you to visit this restaurant and order a plate of kesari, you are sure to fall in love with it. Let me be clear this is no promotional post for Ananda Bhavan or did I get their secret recipe. After many attempts at making this kesari, I did have a good taste of this kesari this morning for breakfast when we went to a close by Ananda Bhavan and with every bite behind my mind I was trying to understand how the recipe is made what ingredients are there and how it gets its taste, on the other hand I had my husband simply enjoying the melt in mouth kesari ;-) long story short I came home and tried this sweet this evening and it turned out an almost close version to the kesari served in A2B. To know if this recipe is a killer you got to try it to know it :P Do we need excuse to make sweets? No right? 

I must admit that this kesari version uses 4 tbsp ghee than the usual home version you gotto remember that this is sure a special sweet so reserve it for those sweet moments and occasions. The trademark taste of A2B kesari is mild sweetness, melt in mouth texture, mild yellow tint and topped with nuts, raisins. Also when you taste this kesari you will not find a trace of cardamom/ elaichi as A2B does not use this ingredient in their kesari. The rava pearls are cooked soft, melt in mouth texture and each spoonful is a sure heavenly bliss. 


ANANDA BHAVAN RAVA KESARI RECIPE

Recipe Source - Own
Serves - 4 generously
Cook & Prep time - 20 mins

Ingredients (please read notes below before doing the recipe)

Rava/ Sooji white variety- 1 cup
Ghee - 4 tbsp ( use a good quality & fragrant Indian Ghee)
Cashew - 8, chopped
Raisins - 10
Boiling water - 2 cups
Sugar - 1/2 - 3/4 cup
Yellow food colour - a pinch (do not add more than this)
Kesar essence - 2 drops (do not add more than this)

Method

(Step by Step pictures of making Kesari)
  • In a wide non stick pan heat 1 tbsp ghee and fry the chopped nuts until golden, drain excess oil and keep in a plate, next fry the raisins wait until they puff, drain excess oil and set aside
  • In a pan boil water in the mean time roast the rava, make sure the water is nice and hot, ready to be used once rava is roasted
  • Add 2 tbsp of ghee to the pan and fry the rava/sooji in medium-low flame for 5-7 minutes until the rava is bit golden and changes colour yet fragrant, stirring frequently (Take care not to burn / brown the rava)
  • Slowly add the boiling water to the roasted rava and stir frequently to avoid lumps, mix well, add food colour and flavouring now (if using) and let it cook, you can use a lid to cover the pan. This would take 3-4 minutes to get cooked.
  • Now add sugar to the rava and toss continuously until the sugar melts and mixes well with the cooked rava, make sure that the rava is fully cooked before adding the sugar.
  • Add ghee and mix well, garnish with the fried nuts and raisins
Serve warm and enjoy


Cooks Wisdom

- Be liberal in using ghee, frying rava with ghee really gives the taste and fragrance to this kesari
- use only a pinch of yellow food color and 2 drops of kesar essence, it gives a mild color and fragrance to the kesari
- Make sure you roast the rava in medium- low flame and keep stirring continuously to avoid the rava from getting burnt
- Adding boiling water to the rava results in evenly cooked rava, avoids lumps 
- Use a good quality and fragrant ghee for ultimate tasting kesari, this recipe purely depends on ghee for its flavor
- Since I have not used milk the shelf life will be for 2 days you can store excess in refrigerator and later reheat and serve hot/ cold

Long Beans Stir Fry with Ground coconut | Karamani Thengai Poriyal | Vegetarian Side

$
0
0


Long beans Poriyal is one of my favourite from Amma's kitchen, a simple easy peesy recipe with her twist of adding ground coconut makes this a super tasting dish. Amma never fails to make vegetarian sides along with veg and non veg curry, meaning there is always a poriyal or stir fry everyday at home. Although I never had an issue eating vegetables when it comes to cooking for 2 hungry tummies and time crunch, I sometimes miss to cook a poriyal hmm I think I must make it a point to cook veggie sides more often like Amma. Ok back to long beans they are known for their rich source of dietary fibre and vitamin A.


 LONG BEANS STIR FRY RECIPE

Recipe - Amma
Serves - 3 generously
Cook & Prep time - 20 mins
Serving Suggestion - Along with white rice, curry & appalam

Ingredients

Karamani / Long beans - 250 grams wash and cut into 1/2" pieces                           
Shallots / small onions/ red onion - 3 tbsp                                                                   
Turmeric powder- 1/2 tsp                                                                              
Jeera / Cumin powder- 1/2 tsp                                                                             
Salt to taste                                                                                             

To Temper

Coconut oil - 2 tsp
Urad dal - 2 tsp
Mustard seeds - 1 tsp
Curry leaves - 3-4

To Grind (coarsely)

Coconut scrapings - 2 tbl sp
Shallots / onions, chopped - 1 tbsp
Green chillies - 3
Jeera / Cumin - 1/2 tsp                    

Method

  • Keep a pan on stove, do the tadka. Add the shallots and fry till raw smell goes. Add the karamani fry for a minute add the spice powders and salt, mix well add some water cover the pan and cook .
  • When the karamani is almost done, add the coconut paste mix well check for spice and salt and remove from stove.

Chocolate Lassi | Chocolate Yoghurt Drink | Chocolate Drink Recipe

$
0
0

R & me are big foodies and we love to try different cuisines, but we do love to go back to favourite recipes and restaurants although its the same usual dishes that we would love to order. We have this one biryani centred restaurant that we both love and on Sunday afternoon's we would go there for a biryani meal and for drinks it has to be chocolate lassi. It certainly is the best drink that I love to enjoy, being a chocoholic I really wonder why I had never thought of this combo hmmm... having that said me being me came home and tried this chocolate lassi..... yum!!!! is the word, try it for yourself and you will keep making this drink often I promise.


CHOCOLATE LASSI RECIPE

Recipe Source - Own
Serves- 2 medium sized glasses
Prep time - 3 minutes

Ingredients

Chilled milk - 1.5 cups (boiled & chilled)
Yoghurt - 3 tbsp
Sugar- as needed
Choco powder - 1 tbsp

Method
  • In a small bowl/ cup take 4 tbsp of milk and mix the choco powder to it. Make sure it is lump free
  • In a mixer / blender add the yoghurt  milk, sugar and the choco mixture blend for a good one minute. 
  • Pour into tall glasses and sprinkle choco powder or chocolate flakes
Serve immediately 


Cooks Wisdom

- Make sure the milk in nice and chill and you can use any % fat milk
- use fresh yoghurt and make sure it is not sour
- For a coffee flavor you can add 1/4 tsp instant coffee powder while blending

Eggless Butterless Sugarless Ragi Banana Choco-chip Muffins | Vegan Ragi Banana Muffins

$
0
0


One of my recent trials in the kitchen was with Palm Jaggery/ Karuppati syrup. I had got this idea from Priya aks of using Palm Jaggery as syrup for daily tea and I wanted to make use of a big batch of this syrup using karupatti which was lying unused in the kitchen and I felt it was time to use it up. Thank you aks for the syrup idea, it is fantastic. And I made aks Choco Ragi Paniyaram using this syrup and it turned out so fabulous that I wanted to give a try to using this syrup in baking and vola I made ragi, banana muffins sweetened with an Indian natural sugar Karupatti/ Palm Jaggery adn the result was a fabulous moist and tasty muffin that is best for those who want to go on a low sugar or no sugar diet and also for those who are looking at baking healthy for their family. Give it a try and I am sure you will not spot that there is no sugar in this muffins. Also wanted to say that these muffins are vegan (no dairy), egg-free, butter-free and Sugarless too... doesn't this sound amazing? Please drop in your thoughts about these muffins below :-)


EGGLESS BUTTERLESS RAGI BANANA MUFFINS RECIPE

Recipe Source ~ Own

Makes ~ muffins

Ingredients


Ragi flour - 1 cup

All purpose flour - 1/2 cup
Baking powder - 1 tsp
Baking soda - 1/2 tsp
Dark Chocolate chips - 3-4 tbsp
Over ripe bananas - 3
Oil - 1/4 cup + 2 tbsp
Palm Jaggery syrup - 3/4 th cup (read notes below)
Vanilla extract - 1 tsp

Method


Line a cupcake tin with liners and set aside. Preheat oven to 365 F or 178 C, take 2 bowls in one mash the banana, add the palm jaggery syrup, oil and vanilla combine well and set aside. In the other bowl add both flours (ragi, all purpose), baking powder, baking soda and combine well using a hand whisk or you could sieve them. Take 1 tbsp of this flour mix and sprinkle on the chocolate chips and set aside. Now add the wet ingredients to the dry, once well combined add the chocolate chips and mix well. The batter would be thick, tip into liners on cupcake tray and bake for 20-25 mins until a toothpick inserted in the centre comes clean. Once done remove from oven and let it cool on a cooling rack on the tin for 15 mins then remove the tin and place muffins on the cooling rack until it comes to room temperature. Now serve along with your cuppa tea/coffee


Cooks Wisdom


- You can alternatively use brown or white sugar 1/2 cup

- You can use nuts or raisins for this muffins instead of choco chips
- I used dark chocochips for a vegan option you can use milk chocochips too
- Do not over beat the batter else the muffins will lose its texture
- Boil 1/2 cup water and add 1 cup palm jaggery to it and let it boil until dissolved  you can store excess syrup in an air tight container and keep it in room temperature. This syrup can be used for daily tea
- Note - since the muffins had banana, diabetics must have small potions and also palm jaggery is said to be a good alternate to white sugar. This does not mean that you can indulge in a big portion. Take care and check with your doctor for further clarifications.
 photo Plain_White_Background_zps9a662d7a.png

Red Apple Pickle | Instant apple pickle

$
0
0

R & Me are big pickle fans, we always buy a bottle of Priya's Urugai no matter where we are, that crazy. But after marriage comes the idea of making pickle at home. For a person like me who can make pickle at home, I am sure anyone can. I always am this person who would love to wind up all the kitchen work under an hour and that includes cleaning, washing etc. Pickles usually have a long process and I love the shortcut version of instant pickles which still hold and develop lots of flavours. I have few other instant pickles which are a big hit at home Tomato Pickle& Mango Pickle. So the other day I had nearly 2 dozen apples and was wondering what to do with them and I was not looking at a sweet recipe so I got this idea of doing a pickle with apples. The result was fabulous, R loved it so much that he had it with his dosa, idly, rice, chappati and even with  curd ;-) the red apples did have a slight sweetness to them I balanced it with lemon juice. 


INDIAN APPLE PICKLE RECIPE

Recipe Source - Own
Prep & Cook time - 15 mins

Ingredients

Red/ Green Apple - 2 large, cored and chopped into small pieces
Oil - 4 tbsp
Mustard seeds - 1/2 tsp
Curry leaves - 1 spring
Fenugreek/ Methi seeds - 1 tsp (roasted and ground to powder)
Urad dal - 1/2 tsp
Hing - 3 pinches
Red chilli powder - 1/2 - 3/4 th tsp (Adjust as per spice tolerance)
Kashmiri red chilli - 1 tsp (adds colour)
Turmeric powder - 1/4 tsp
Lemon juice - 2 tbsp (this adds tartness)

Method
  • In a wide pan dry roast fenugreek seeds in medium-low flame for 2 minutes until a little golden, cool and then ground to powder using a mixer/ motar
  • Core the apples, chop into bite sized chunks, add 1 tbsp of lemon juice and give it a good mix along with salt, set aside. This helps in the apples from de-colouring.
  • In the same pan add oil, once its hot splutter mustard seeds, curry leaves, hing, ground fenugreek powder, red chilli, kashmiri red chilli, turmeric and salt.
  • To this add the prep'd apple chunks and toss well let it cook for just a minute switch off and let it cool completely, Now add remaining lemon juice and mix well
  • Store in an air-tight container and enjoy for upto a week

Cooks Wisdom

- Make sure you do not chop apple too fine as it might become mushy. And do not keep apples in flame for more than a minute it will turn very soft and cook very fast
- This pickle is an instant one and hence would last for upto a week in a refrigerator. Take care to use a clean and dry spoon to use the pickle this helps in its shelf life.
- You can adjust spice according to your taste. As red apples on the sweeter side, so I have balanced with lemon juice.
 photo Plain_White_Background_zps9a662d7a.png

Wheat Semolina Upma | Godumai Rava Upma | Samba Rava Diabetic friendly Recipe

$
0
0

Samba Rava or Wheat Semolina Upma is one of my favourite and go to recipe these day. I simply love to enjoy this upma with Ketchup or curd. There is a slight twist to this recipe and I learnt this from R's aunt who made this for us when we visited her. Also I find samba rav/ wheat sooji at its best in Tamilnadu, in Karnataka we get very course wheat rava that resemble saw dust... grrr.. So on our way back we picked a 5 kg Wheat rava back home :) and ever since I have made this upma countless number of times. You might ask me does this sooji even have a taste? well the secret is in the preparation really. Of course me being me tried various versions of breakfast & dinner recipes using Samba rava which will appear in the blog I promise. You know many of my friends do not like samba rava and one big reason is that it tastes bland and unlike the white sooji its counterpart which absorbs much flavours samba is a little tricky, but don't worry this recipe will sure result in a great tasting upma with flavour. I have posted earlier a Samba Rava upma which is more like a main which needs a curry to to paired with unlike this recipe here.


SAMBA RAVA UPMA RECIPE

Recipe Source ~ R's aunt
Prep & cook time ~ 10 mins
Serves ~ 2-3 
Serving suggestion ~ Tomato Ketch up or Curd & pickle, Curry

Ingredients

Samba Rava/ Wheat Sooji/ Wheat Semolina - 1 cup
Onion - 1 large chopped fine
Tomato - 1 large chopped fine
Green chilli - 5-6 chopped
Ginger - 1" chopped fine
Curry leaves - 1 spring
Coconut oil - 2 tbsp (a must as this adds flavour)
Mustard seeds - 1 tsp
Urad dal - 1/2 tsp
Chana dal - 1/2 tsp
Coriander leaves - 1 tbsp chopped

Method
  • In a wide non stick pan on medium flame, roast the wheat rava for 3-4 minutes. Transfer to a plate to cool down, set aside.
  • In the same pan heat coconut oil, splutter mustard seeds then add urad dal, channa dal, ginger, curry leaves, onions, green chilli and saute until the onions are half cooked. 
  • Now add roasted rava salt and mix well, pour the boiling water and cook covered with a lid for 3 minutes in medium flame.
  • Once the water evaporates, stir the upma such that it is like a thick mass.
Serve warm with tomato ketchup, curry or curd


Cooks Wisdom

- Coconut oil adds favour to this upma, you can also add ghee or vegetable oil
- Its a mind flavoured upma and not too spicy if you want more spice then add 2 extra green chilli.
-Garnish with mint or coriander leaves for additional flavour
 photo Plain_White_Background_zps9a662d7a.png

Homemade Ghee Recipe | How to make Ghee at home | Step by Step

$
0
0

I never know an Indian who hates Ghee, have you? Most Indian sweets and recipes call for Ghee and I feel its apt to have a post on how to make Ghee in my space. I love the fragrance and taste of ghee on hot white rice/ sambar sadam but I love it all the more in sweets. If North India are known for sweets using milk, South India is known for Ghee sweets right from the famous Pure Ghee Mysore Pak to the Maavu Ladoos Ghee is adorned. Although I must admit that I am a lazy person who would prefer to pick a pack of ghee from the supermarket, I have made it a point to make ghee at home, just like ginger-garlic paste, coconut milk, tamarind paste and so on. I have to say there cannot be anything near the homemade ghee and the way your kitchen is full of aroma of the ghee is totally heavenly. Reminds me that Amma too makes ghee at home although her version is with curry leaves to give an extra punch but somehow I did not add curry leaves or rock salt to this recipe. Since I love it plain and pure so that I can use it for savory and sweet dishes.


What butter do I use for making home-made ghee? Salted or Unsalted?

This is a frequently asked question. Personally I love to use unsalted butter since ghee can be used for both sweet & savoury recipes, if its salted you would not know how much salt to use in the recipe. So I go for unsalted butter. One other thing is that salted butter when melted foams up too much, so take care while making ghee using salted butter.


HOW TO MAKE HOMEMADE GHEE ?

Ingredients

Unsalted butter - 2 cups or 250 gms

Method
  • Unwarp the butter and keep in outside until it comes to room temprature
  • In a dry non stick pan on medium heat add the solid butter and wait for it to melt completely this would take 2-3 minutes

  • Slowly the melted butter starts boiling, it foams up and starts cracking (you will hear a cracking sound). Make sure the flame is in low and allow it to boil further. You will see the butter clearing up on top 

  • As the butter further boils the soft foams turn as bubbles and the bubbles become even more fine. Keep stirring occasionally now you will see the milk solids settling to the bottom of the pan

  • At this point the crackling subsides. Switch off. Prep a cleaned and dry bottle or glass jar (remember not to store in a plastic bottle) as you will be pouring the still warm ghee into it. Using a filter/ strainer pour the melted/ clarified ghee into the bottle. Leave it in room temperature to solidify on its own. It took me an hour for the ghee to solidify 

Cooks Wisdom

- I used store bought unsalted butter for making ghee, you can use full fat homemade butter too
- Take care not to burn/ overcook the melted ghee (beyond the subsiding cracking sound) this will give a burnt taste
- Store in a clean and dry bottle without the lid until the ghee comes to room temperature and solidify
- You can add a spring of curry leaves for a fragrant smell but this is totally optional, I have not used it
- This homemade ghee is good in room temperature for upto 2 months you can store it even in the refrigerator. 


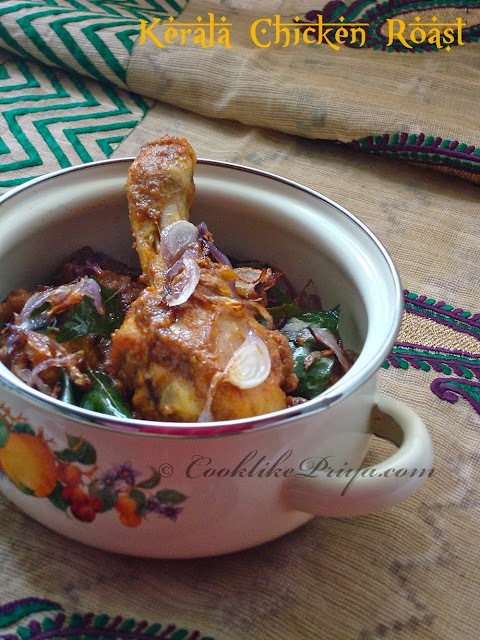
Kerala Chicken Roast | Indian Chicken Roast

$
0
0

My love for Chicken has no limits :-) every fortnight we have a dish with Chicken and trust me I usually love make Chicken Masala / Thokku rather than a plain Chicken Curry. This Kerala Chicken Roast is a family favourite and is great as a side for white rice / appam/ dosa / idly. I would call this a quick marination recipe and also one that is slow cooked to get its flavours. So make sure you take time to do this curry but I promise it tastes better than it looks :P. I had to serve husband his lunch and then click pictures and hence I could not do much justice with the captures. 

Kerala Chicken Roast is marinated with spices and floured, fried to hold its flavours and then cooked with a masala/ thokku in a slow flame to develop flavours. Its a great and satisfying side to any main and is not very spicy in my opinion. You can adjust the spices according to your taste and liking but do follow the same method of cooking for a great tasting Chicken Roast.


KERALA CHICKEN ROAST

Recipe Source ~ Own
Cook & Prep time ~ 40 mins plus marination of 1 hour
Serves ~ 3-4
Serving Suggestion ~ Rice, Appam, Idly or Dosa

Ingredients

To Marinate 

Chicken - 1/2 kg or 500 gms
Grated coconut - 2 tbsp
Ginger garlic paste - 1 tbsp
Red chilli powder - 1 tsp
Turmeric powder - 1/2 tsp
Coriander powder - 2 tsp
Fennel powder - 1 tsp
Salt - as required
Coconut oil - 1 tbsp

For the Roast

Rice flour - 2-3 tbsp
Onion - 1 large sliced thin
Curry leaves - 2 spring
Coconut Oil - 2 - 3 tbsp
Tomato - 2 large, made to a paste
Fennel powder - 1 tsp
Kashmiri Red chilli powder - 2 tsp

Method

  • Wash the chicken well with water for 2-3 times, let the excess water drain from a colander. Once its dry add all the ingredients mentioned under to marinate and give a good mix, close with a lid and set aside for 1 hour.
  • As the chicken marinates, add 1 tbsp of coconut oil and partially fry the slices onions and curry leaves, set aside
  • In the same pan add more coconut oil, roll the chicken with rice flour (this helps the marinate to hold its spices) and partially fry the chicken pieces flipping sides for 10 minutes, do not overcrowd the chicken add in batches of 2-3
  • Once all the chicken pieces are fried  using a slotted spoon drain the chicken pieces and set aside.
  • In the same pan add half of the fried onions and curry leaves, add the pureed tomato and add fennel powder, kashmiri red chilli and keep on low flame and roast this until oil separates  This should take 3-4 minutes.
  • Now add the fried chicken and give it a good mix, add one cup water and cook with a coverd lid for 15 minutes further until all the flavours mingle and oil separates.
  • Taste and check for salt, garnish with remaining fried onions and serve warm with rice


Cooks Wisdom

- Slow cooking is the key to this curry so don't do it in a hurry.
- One secret ingredient is fennel powder, I used store bought one. You can use fresh powder by grinding fennel along with the other spice powders
- Make sure the chicken is dry while adding the marinate powders.
- Use Rice flour only before pan frying the chicken with coconut oil
- I used coconut oil for an aromatic flavour you can use regular oil too

Check out my other popular Chicken recipes below -


 photo Plain_White_Background_zps9a662d7a.png

BCAM - Breast Cancer Awareness Month Fund Raising Event

$
0
0
Hi All,

We are feeling proud to announce this useful fund raising event to bring awareness among many people and also to help people who are already diagnosed and need help with regards to the cost of the treatment. We a group of bloggers joined together to spread this awareness lot faster and in a wider range in the network world.We would like to sincerely thank each of our blogger buddies to put this forward and as well as help with regards to the donation as well. Here is list of all my blogger friends who are contributing their time and space for this 

NOTE: Anyone who is interested in posting this event on their website/blog, please feel free to contact Anu at anu (dot) healthykitchen (at) gmail (dot) com event.

Anu Shoj of Anu's Healthy Kitchen
Vardhini of Cooks Joy
Priya Suresh of Priya’s Versatile Recipes
Manjula of Desi Fiesta
Sangee of Spicy Treats
Nalini of Nalini’s Kitchen
Tanusree of Ma Niche
Viji of Virunthu Unna Vaanga

& Me (CooklikePriya)

We decided to donate to Susan G. Komen (http://ww5.komen.org/), which was created by Nancy G. Brinker in 1982 who is Susan G. Komen's sister. She is "Fulfilling the Promise" which she gave her sister when she was dying. That promise became Susan G. Komen for the cure and launched the global breast cancer movement. To know more about Susan G. Komen and the organization please visit the above link mentioned at the beginning of this paragraph.We welcome all my friends to spend few moments here and if you feel its worth donating you can do so. 

Here are the details as to how to donate:

  • You can either directly go to their website(http://ww5.komen.org/Donate/Donate.html) and donate in any method that which you are comfortable
  •  Or you can email Anu at anu (dot) healthykitchen (at) gmail (dot) com, and she  will reply to your email and take it from there.
  •  Event Date Oct 1th - Nov 15th
  •  Please email me / leave a comment here, before/after you do the donation with the 
  • Amount You Wish/Did Donate (This is just to calculate how much we have 
  • Collected at the end of this event, We are not concerned as to how much you would 

Note: If you have any questions or concerns, please email me at Mailfigsandolives (at) gmail (dot) com or leave a comment here at the end of this post

Anu at Anu's Healthy Kitchen will keep on updating the list of persons who donate and at the end of the event we will also mention the amount we collected in total. 
Am so happy to be a part of this fund raising event :). Thanks to +Anu Shoj  for this wonderful initiative. This is my first blog post for a social cause feeling very happy to share this with you all .
 photo Plain_White_Background_zps9a662d7a.png

Apple Oats Porridge | Apple Oats Breakfast Recipe | Oats Recipe

$
0
0


'An Apple a day keeps the doctor away', we all know this but still tell me how many of us have an apple a day? Even I don't, so the other day I had this reader who requested me for a different oats porridge recipe, since I had already posted a savoury version of oats porridge - Masala Oats, I thought why not post a sweeter version along with fruit. This is sure a quick and simple recipe, you can even serve it for kids. Apple tend to have a natural sugar and I have partially cooked it along with oats and milk to have a sweetened yet fragrant taste. Topping nuts on this oats add a lovely crunch to this porridge, I love to have this warm and even cold both ways it tastes amazing.


APPLE OATS PORRIDGE 

Recipe Source - Own
Serves - 2
Prep & cook time - under 5 mins

Ingredients

Red Apple/ Custard apple - 1 large, grated along with skin
Quick cooking oats - 3 tbsp
Milk - 5 tbsp
Water - 1/4 cup
Honey - for sweetening (optional)
Chopped almonds or any nuts - to garnish (recommended)

Method

  • In a saucepan heat water, add the oats and let it cook on a medium-high flame as the oats becomes thick around 2 mins add the grated apple to it and let it simmer.
  • Now add warm milk to this and let it cook for another minute. Switch off 
  • Serve topped with honey and nuts


Cooks Wisdom

- Partial cooking of the apple along with oats gives a natural sweetening
- For more flavour you can add cinnamon but I loved the natural apple flavour t the porridge
- You can add your favourite nuts, dry fruits, granola or muesli for an extra crunch
 photo Plain_White_Background_zps9a662d7a.png

Wheat Flour Almond Cookie | Atta Badam Biscuit Recipe | Cardamom Flavoured Cookie

$
0
0


;-) How fun would life be if cookies were perfect for diet ??? sigh... As I write this post I  so miss munching on these buttery cookies that I baked a fortnight ago. I love to bake and the baking bug seem to have vanished now and apparently when I do I seem to do it quite frequently. Does this happen to you? as of now I am on a baking low, so hence to boost up my spirits thought of doing this post on cookies. There cannot be an easier recipe as this for someone who is a beginner in baking. And I have to mention that these cookies don't have any baking powder or baking soda so its kids friendly in every way.


WHEAT FLOUR ALMOND COOKIE RECIPE

Recipe Source ~ Manjula
Makes ~ 12 medium-big cookies
Prep & Bake time ~ 20 mins

Ingredients 

1 cup whole wheat flour
1/2 cup sugar
1/4 tsp salt
1/2 tsp cardamom powder
1/2 cup unsalted butter 
2 tablespoons of milk or less

Method


  • Pre heat the oven to 360 degree F. In a bowl, mix the flour, sugar, salt, sliced almonds and cardamom powder well.
  • Next add soft butter and milk to the flour mixture to make dough. Dough should be very soft.Divide the dough into about 24 equal parts and make them into balls.
  • Press each ball between your palms lightly; every piece should be about 1/2” in thickness.Place the dough balls on a grease free cookie sheet about inch a part.
  • Bake the cookies for about 18 minutes or until cookies are lightly gold brown.
  • After they become lightly golden brown remove the cookie sheet from the oven. Let the cookies cool down for two to three minutes before taking them off the cookie sheet.

Easy Chana Masala with Coconut | Chana Kurma | Chickpeas Curry Recipe

$
0
0

One big favourite of mine from the legume family is Chickpeas. I simply love it in a pulao or curry or even as a sundal (stir-fry). I have posted Chickpeas Pulao and Chickpeas Sundal earlier, so I felt the urge to post a Chickpeas Coconut Curry/ Channa Kurma (with coconut and tomato). That said my husband on the other had does not love like chickpeas in any form. He does not find it interesting or even appetizing to eat...sign... So now you know why chickpeas does not appear on the blog frequently. But I do have days where I want to have what I want to have and made this Kurma just for myself, yes your read it right ;-) I made this kurma with a handful of Chickpeas and there are no words to describe how happy I really was enjoying it all alone ;-) food does make me happy!


CHANA MASALA RECIPE

Recipe Source~ Own
Serves ~ 2 generously
Prep & cook time ~ 25 mins
Serving suggestion ~ Roti, chappti or white rice

Ingredients

Channa/ Chickpeas - 1/2 cup, soaked overnight & pressure cooked for 5 hisses 
Onion - 1 large, chopped fine
Tomato - 2 large purred
Ginger garlic paste - 1 tbsp
Shredded coconut - 5 tbsp
Oil - 3 tsp
Cinnamon - 1"stick
Bay leaf - 1
Cloves - 2
Cardamom - 2
Fennel seeds - 2 tsp
Coriander leaf - to garnish
Turmeric powder - 1/4 tsp
Red chilli powder - 1 tsp
Coriander powder - 2 tsp
Garam masala - 1/3 tsp
Salt - to taste

Method

  • Soak chickpeas/channa overnight and pressure cook with 2 cups water along with salt for 5 hisses. Let the pressure gradually reduce and set aside
  • In a wide non stick pan heat oil, add the whole spices one by one - bay leaf, cinnamon stick, cloves, cardamom, let it fry fro few seconds you will get a lovely aroma.
  • Now add the chopped onions and saute for 2 minutes until it gets translucent. Add the ginger garlic paste and saute until the raw smell goes
  • Now add the spice powders except garam masala and saute for 10 seconds, now add the pureed tomato and mix well. Let this boil for 3-4 minutes.
  • Add 1 cup water and bring this to a boil. Add the drained chickpeas and mix well, as it boils prepare the paste of coconut and fennel seeds
  • Add the paste to the curry and let it cook for 4 minutes, check for salt and spices
Serve hot with chappati or rice


Cooks Wisdom

- Make sure the chickpeas are soft and well cooked before adding to the curry, I prefer soaking the chickpeas overnight and later pressure cooking them compared to store bought tinned ones
- Make sure the coconut paste is nice and smooth, adding fennel adds additional flavour so do not miss to add them
 photo Plain_White_Background_zps9a662d7a.png

Apple Lapsi | Apple Kesari | Rajastani Lapsi | Apple and daliya halwa

$
0
0

It was again another weekend and I was busy in the kitchen to stir some recipes. I had a sweet tooth calling hence made this simple apple lapsi which I had bookmarked long back from my dear friend +Preeti Tamilarasan . Since I had all the ingredients in hand I just went ahead with the recipe as I was cooking other recipes alongside. As I was eager to taste the lapsi when it still hot, I burnt my tongue :-( does this happen to you? and later no matter how much I tried to taste this lapsi after it cooled down I still could not actually taste the sweetness... grrrr I was bit bugged and decided to reserve some for myself in the refrigerator to try the next day. And to my surprise it was too good. For all those you do not what lapsi is its a famous Rajasthani sweet usually done to feast on important occasions like festivals, marriage feasts and also house warming. Since all the ingredients are easily found in South India its something we all ought to try. I can say that its a good counter part to the Rava Kesari that is quite famous in South India. But nevertheless both kesari and lapsi have their uniqueness in flavour and texture.


APPLE LAPSI RECIPE


Recipe Source - Preeti

Serves ~ 4 generously
Cook & Prep time ~ under 20 mins

Ingredients 


1 cup Daliya (Bulgar / Broken Wheat / Godhumai Rava)

3/4 cup sugar
1 cup apple shredded
2-3 tbsp ghee (clarified butter)
1 tsp cardamom powder
3 cup warm water
dry nuts - to garnish

Method
  • In a wide non stick pan heat ghee, roast dry nuts in ghee, set aside. Now add the wheat rava to it and stir well on low flame for 5-8 mins till nice aroma comes.
  • Add water to it and stir frequently on medium flame. Let it cook on low flame for 10 mins till daliya is cooked.
  • Add sugar and cardamom seeds powder to it. Mix well everything and cook for another 5 mins.
  • Now add shredded apple and coo further for 5 mins. Remove from the heat once it starts leaving the sides of pan. Serve hot or cold.

Cooks Wisdom


- Roasting wheat rava/ daliya is very important take care to take time and roast for atleast 8-10 minutes under low flame to avoid it from getting burnt

- Personally I loved to enjoy this lapsi when cold or in room temperature 
- You can also add puréed apple or any other fruit / veg (carrots, beets)

Linking this to This beauties are going Diwali Delicacies Event, hosted by Priya aks and Sangee Vijay of spicy treats.

 photo Plain_White_Background_zps9a662d7a.png

Reshmi Kebab | Creamy Chicken Kebab | Oven baked Reshmi Kebab | Chicken Starter Recipe

$
0
0


Are you a Kebab lover like me? Both R & me are great fans of tandoori chicken, chicken tikka and Reshmi Kebab is another variation to the spicy tandoori varieties like Tandoori Chicken, Chicken Tikka... etc. A Kebab is usually a skewer based tandoori recipe, but here I have used the same marinate for regular chicken pieces and broiled them in the oven to get a tandoori effect. Although you can use the same marinate to broil boneless chicken thighs or even minced chicken and roll them on wooden skewers and broil for the same temperature. I made this as a starter for a meal we planned for a lovely couple a few days ago. Everyone really enjoyed this Reshmi Kebab and I was so pleased :-)

Reshmi Kebab is made with marinated chicken in full fat cream, pepper, kastoori methi (dried fenugreek leaves), mint leaves and salt. This tender meat is then oven broiled to get a perfect tandoori effect. Its mild in spices and you do not need any artificial colouring, yet the chicken is succulent and juicy holding its flavours. 


RESHMI KEBAB RECIPE 

Chicken (with bones/boneless) - 500 gms/ 1/2 kg
Heavy Cream - 1/2 cup (I used Amul, it is nice and thick)
Butter - 2 tbsp melted
Cornflour - 1 tbsp 
Salt - to taste
Lemon wedges - to serve

Grind to a paste

Dried fenugreek leaves / Kastoori Methi - 1 tbsp
Mint leaves, chopped fine - 2 tbsp
Black pepper powder - 1 tsp
Green chillies chopped - 3-4 nos
Garlic - 3 pods

Method
  • Wash the chicken in running water - 3-4 times and set on a colander to drain water completely for 10 minutes. Make small slits on the chicken such that the marination gets well inside the meat
  • Now grind to a paste all the ingredients mentioned under to grind
  • In a small bowl add the ground paste and the cream, salt mix well and taste to check salt and spice level, you can add may be 1/2 tsp more pepper if required
  • Now add this paste to the chicken in a large bowl and mix well, cover with cling film/ a lid and keep in refrigerator for minimum 5 hours or overnight (I usually let it marinate overnight)
  • Make sure to bring the marinated chicken 30 mins in room temperature before broiling them
  • Next day pre-heat oven to 225 C/ 437  F broil/ grill / fan grill mode for 10 mins, prepare the baking tray with a silver foil and place the chicken pieces on them, drizzle melted ghee and sprinkle cornflour on top
  • Bake for 25 mins on one side then remove the pan carefully and turn sides to cook further for 20 minutes.
  • Once done remove the tray from the oven place on a cooling rack, remove from the pan and serve hot 
  • Just before serving drizzle lemon juice and serve 


Cooks Wisdom

- If you are using wooden skewers soak them for 3 hours in warm water and then use. Metal skewers can be used directly
- You can mix and match the proportions of ingredients to suit our taste except for the cream
- I added less butter since I used heavy cream, you can use more butter if you want more
- Adding cornflour helps in the chicken turning a little crisp on the outside, it gives a good crust

Check out my Chicken Tikka Recipe HERE

Green Chutney dip (yoghurt based) check it out HERE
 photo Plain_White_Background_zps9a662d7a.png

Sakkarai Pongal | Sweet Pongal | South Indian Rice Sweet

$
0
0

Shakkarai Pongal is a sweetened rice that is famous in Tamil Nadu. Usually made during festivals, Pongal to be exact. But as far as I know this sweet pongal is a common occurrence in my home right from childhood days till now. Earlier it used to be Appa who is a big fan of Shakkarai pongal and to fulfil his sweet tooth Amma used to make this pongal loaded with ghee and nuts but now its my husband's favourite  of course I had to get it right and according to his taste. There are various versions of Shakkarai Pongal in every household, my version is a quickie and without milk, so you can call it a simple Chakkarai pongal. Since its R's favourite  it had to be blogged. I feel that I have not done justice to the pictures and the one and only reason for this is R himself, cos he did not let me click, as he was waiting to enjoy his share of pongal which was being captured :-P. Once a month I make both Ven Pongal and Shakkari Pongal at home for our Saturday breakfast menu. So to make matters simple I pressure cook raw rice and moong dal until soft, mash it up using a laddle and divide it for the 2 recipes and do the rest. So without much delay lets go to the recipe


SHAKKAI PONGAL RECIPE

Recipe Source ~ Own
Serves ~ 3-4 generously

Ingredients

Raw Rice - 1 cup
Moong dal / Split yellow dal - 1/4 cup
Water - 3 cups (to pressure cook rice &dal)
Jaggery - 1/2 cup powdered
Cardamom powder - 1/2 tsp
Cashew - 2 tbsp chopped
Raisins - 1 tbsp
Sugar - 2 tbsp (recommended can be reduced)
Ghee - 3 tbsp

Method
  • In a bowl take both the rice and dal, soak for 10-15 mins. Heat water in a pressure cooker and once it starts to boil add the soaked rice & dal. Cover the lid and attach the cooker weight, pressure cook for 4 whistles until soft. 
  • In the meantime bring 1/2 cup water to a boil, add the powdered/ grated jaggery to it, bring it to a boil and once it all melts, let it cook further to become thick, this takes 7 minutes, strain the jaggery syrup and set aside
  • Let the pressure gradually settle, open the lid and using a wooded laddle partially mash the rice & dal, set aside
  • In a wide pan add ghee fry the cashew and raisins one after the other and set aside. To the same pan heat the rest of the ghee add the mashed rice & dal, jaggery syrup. Once it starts to boil, add the cardamom powder and sugar mix well, cook further until it turns to a thick mass and starts to leave the pan. This takes 3 minutes.
Top with nuts & raisins serve warm / cold


Cooks Wisdom

- You can even add coconut bits or even grated coconut while frying the nuts for additional flavour
- Some love to add nutmeg and camphor (edible), if you plan to use them use a very tiny pinch of both not more than that. Since R does not like both flavours I have not used it in this recipe
- Make sure rice and dal is well cooked else add more water and pressure cook for 2 more whistles 
- You can alternately dry roast the dal before pressure cooking, but I usually don't do it
- Adding jaggery gives the yellow tint to the sweet pongal, so this may vary depending on the quality of jaggery you use

Linking this to Tamizhar Samayal Tuesday event started by Nalini.

 photo Plain_White_Background_zps9a662d7a.png

Banana Kuzhi Paniyaram | Sweet Paniyaram Recipe | Banana Coconut Paniyaram

$
0
0
Banana Bajji, Banana Chips, Banana cake anything bananas I go bananas ;-) I love every cooked variety of banana recipe but somehow I do not enjoy eating this one fruit as a fruit. Note I never said I hate it, I simply do not enjoy it. Being a fruit lover and a blogger, I do try to cook with fruits often. But this banana paniyaram is something I have been hooked onto as a teenager. Amma usually fried this batter in oil, they are called Pazha Appam but I love this paniyaram version better since it is less calories. R on the other hand has never tried any kind of banana recipes other than the bakes that I do now and then. This version of paniyaram he loved it so much. I served it alongside tea on a sunday evening. 

Banana Paniyaram is a quick to do snack when you are craving for something sweet. It is spongy, sweet and light to bite. I have sweetened the batter with jaggery syrup, you can even use palm jaggery syrup for a more healthy alternative. For diabetics you can make it with sugarfree.


BANANA PANIYARAM RECIPE

Recipe Source - Own
Makes - 10-12 paniyarams

Ingredients 

Over ripe bananas- 2 mashed
Jaggery syrup/ palm jaggery syrup - 1/2 cup
Sugar - 3 tbsp
Cardamom powder - 1/2 tsp (optional)
Milk - 2-3 tbsp (optional)
Maida - 1/4 cup
Wheat flour - 1/2 cup
Baking soda - 1/4 tsp
Broken cashew - 2 tbsp, chopped
Grated coconut - 3 tbsp
Coconut oil / Ghee - to grease paniyaram molds ( as required)

Method

  • In a wide bowl add all the dry ingredients - wheat flour, maida, baking soda, salt, sugar mix well and set aside
  • In another bowl mash the over-riped bananas, add the jaggery syrup, mix well, shredded coconut, nuts and if adding milk you can add now. To this add the dry ingredients, combine until well even
  • On the stove heat the panniyaram pan and once its nice and hot reduce the temperature to medium-low, grease with coconut oil/ ghee and using a laddle pour the batter on the moulds.
  • Let it cook for 3-4 minutes on one side and using a fork flip the other side and let it cook further for 3 minutes until evenly cooked. You can drizzle more oil/ghee if required
  • Once you complete the same process for the entire batter, switch off 
Serve warm


Cooks Wisdom

- You can use jagger/palm jaggery/ sugar to sweeten this paniyaram. Personally I love to use more jaggery and a little sugar for a sweet taste
- Adding coconut is optional, I used coconut oil to fry these paniyaram you can go ahead and use ghee
- Make sure that the bananas are super ripe for a great tasting paniyaram
- Alternatively you can deep-fry the batter to get Pazham Appam
 photo Plain_White_Background_zps9a662d7a.png

Mysore Pak | South Indian Mysore Pak

$
0
0

Have you ever tried something and it ended up as a kitchen flop and never had the guts to try it again? well that's me. Last year around this time I tried this Mysore Pak recipe and it ended up in a Mysore Fudge all gooey and although it tasted pretty ok I was not so pleased with it and decided to bin it. Seriously felt bad that I wasted that amount of ghee. After a year I am back again with doing this recipe of Mysore Pak and it turned out just right. Nevertheless I have conquered the fear to try mysore pak at home and have been waiting to hear what my husband has to say about it as I try to type this post here. Will update the verdict soon :-) I promise. Divya thank you so much for this lovely recipe, all credits to you.


Mysore Pak is a speciality ghee sweet made in Karnataka that is loaded with a lot of ghee and tends to melt in your mouth. There are various versions of Mysore pak starting from firm porous burfi type, soft melt in mouth and a mix of both you can say inbetween firm less porous  burfi kind and yet melt in mouth soft texture. This version that I have shared here is a fair mix of both the soft and hard type mysore pak. If u are a beginner or doing this for the first time I suggest you take a helping hand while doing Mysore Pak


MYSORE PAK RECIPE (please check notes before doing the recipe)

Recipe Source - Divya's Culinary Journey
Makes - 14 small rectangles
Cook & Prep time - 15 mins 

Ingredients

Gram Flour/ Besan/ Chickpeas flour - 1/2 cup
Oil - 1/4 cup
Sugar - 1 cup 
Water - 1/2 cup
Ghee- 1/2 cup melted

Method
  • First prepare and keep ready all ingredients - melt 1/2 cup ghee and let it cool down. Add sugar to a non stick pan, mix besan and oil to a smooth paste. Grease a tin/ plate with ghee (I used a loaf tin) which was perfect for the amount of mysore pak I made


  • Now in the pan of sugar add water and bring it to a boil. as shown below the sugar syrup will boil and come to different stages starting with medium bubbles with more bubbles and large bubbles. Now you need to check for one string consistency by using a laddle you take little of the syrup blow the heat and touch with your thumb and index finger and check for one sting (very important)


  • Once the one string is achieved add the besan oil mixture and keep continuously mixing with a spoon and do not stop (medium-low flame) and keep adding ghee little by little in one hand and mixing in the other hand, both has to happen simultaneously. After 2 minutes or so you will see the mixture changing colour.


  • At one point the mixture will start leaving the sides of the pan. Immediately pour into the greased pan, if you find it still bubbling just tap 2-3 times on the counter top. Exactly after a minute the mixture will become solid, using a greased knife and cut into slices. Immediately reverse the pan and transfer the mysore pak into a plate.


Relish it warm or in room temperature and enjoy :-)


Cooks Wisdom

- Make sure you keep all ingredients and preparations ready before starting off to do the cooking part.

- Never ever over cook the sugar syrup to more than one string the texture of the mysore pak will definitely change.
- You can add more ghee if required I just added 1/2 cup 
- Make sure you use good quality gram flour that is fresh 
- Take care not to burn yourself while making the mysore pak, and especially during checking the one string consistency
- Make sure you cut the slices when its still warm else it will start breaking and you will not have even slices and also tilt them to a plate immediately after cutting into slices

Linking this amazing melt in mouth Mysore Pak to SNC Celebration Challenge hosted by
Divya Pramil and this lovely recipe challenged by Divya Prakash
so happy to be part of this group of amazing friends & bloggers. 
Happy Anniversary to SNC Team ! 

Linking this to the Diwali Delicacies event hosted by Priya aks & Sangee also to Vardhini's event Diwali Bash
 photo Plain_White_Background_zps9a662d7a.png

Kheema Cutets | Goat Keema Cutlet | Keema Starter Recipe

$
0
0
Mutton Kheema Cutlets are a big hit at home, Amma makes it so well and as kids we never complain to eat them :-). She made sure to do it once a month and when everyone is at home. A super simple recipe and you can even do it ahead and then shallow fry them when you want it. The minced meat is pre-cooked and made into dumplings along with mashed potatoes and spices. Later coated with batter rolled on breadcrumbs and then shallow fried. You really do not need a side to dip these cutlets they taste great on their own.

So last weekend when we had friends over for lunch I made these as a starter and they simply enjoyed these Kheema cutlets a lot and everyone wanted a second and third serving ;-) I couldn't be more happy. 


KHEEMA CUTLETS RECIPE

Recipe Source - Own
Makes -12-13 medium cutlets
Cook time - 15 mins
Prep time - 15 mins

Ingredients

To pressure cook

Minced meat (goat) or chicken - 250 gms
Water - 1 cup
Turmeric powder - 1/2 tsp
Salt - 1 tsp

For the cutlet base

Potato- 1 large boiled and mashed
Green chilli - 5-6 nos finely minced
Fennel seeds - 2 tsp powdered/ use fennel powder
Salt as required

Coating 

Egg - 2 large, beated
Breadcrumbs- as required (approx 1 and 1/2 cup)-Click HERE for homemade breadcrumbs recipe

Method

  • Pressure cook the meat with water, turmeric and salt for 4-5 whistles until well cooked. Once the pressure settles down, open the lid and check it the water has evaporated else strain it you can use that water a stock to soup or cook further until all the water is evaporated. Set aside and let this cool down
  • Boil and cook the potatoes. mash and set aside. To this add the minced green chilli, fennel powder and salt. Taste to check for spice and salt
  • Now add the cooked meat to this and prepare dumplings or balls and flatten it. Arrange them on a plate, you can freeze these to be used later or refrigerate according to your convenience
  • Just before shallow frying them, take them outside and let it come down to room temperature.
  • Once its ready drip each dumpling in egg wash and roll on breadcrumbs, tap the excess and arrange on a plate, repeat this to all the dumplings
  • Heat oil as required to shallow fry and fry each side for 2 minutes and flip to fry the other side
Serve warm and enjoy :-)


Cooks Wisdom

- Make sure that the meat is well cooked, since its pre-cooked I only shallow fried it. Alternately you can deep fry the potato dumplings directly in oil 
- These patties can be freezed to use later too for burgers and even for a lunch in a sandwich
- You can add spices too and make it more tasty, nevertheless these taste great without any spice powders
- I used the home-made breadcrumbs that I did a while ago, check the post HERE
 photo Plain_White_Background_zps9a662d7a.png

Kesar Nan Khatai Cookies | Flavored Nan Khatai Biscuit

$
0
0


I love Indian bakery goodies, and of all the different bakes my most favourite is Nan Khatai and since its festival season I thought why not doing a twist with the traditional Nan Khatai by making it a Saffron flavoured. Nan Khatai are buttery melt in the mouth cookies and have a crumbly texture. The cookies are great as a snack and can be wrapped as a treat for guests or kids. Saffron Nan Khatai are firm on the outside with a slight mithai flavour on the inside. The topped nuts add to the crunch and taste. These colourful Saffron Nan Khatai are sure a joy to taste and attractive looking. Give this a dry during the festive time. 


KESAR NAN KHATAI RECIPE

Recipe Source - Own
Makes - 10-12 medium cookies
Total time - 35 mins

Ingredients

Gram/Gram/Chickpea Flour - 1/2 cup
All purpose flour/ maida - 1 cup
Sooji - 3 tbsp
Sugar - 1/2 cup, powdered 
Cardamom powder - 1 tsp
Ghee - 3 tbsp (melted)
Butter - 4 tbsp (melted)
Kesar food colour - 2 pinches (optional)
Kewar extract - 3 drops

Method

  • In a bowl add gram flour, maida, sooji, powdered sugar, cardamom powder, food colour and kewar extract, mix well and set aside
  • Melt butter and ghee together and let it cool down, now add this to the dry ingredients little by little to get a smooth dough(in case you added more ghee/butter and the mixture is runny. Pop in the refrigerator for 10-15 mins to become firm to handle)
  • Preheat oven to 300 F/ 150 C for 10 minutes, prepare a baking tray with parchment/ butter paper. Roll the dough into balls and place on the tray. Add the chopped nuts on top and press them gently to flatten a bit
  • Bake for 30- 35 minutes until the cookies are firm and have a golden base, make sure that the cookies do not get burnt (keep a close watch on the cookies after 25 mins) Once done remove from oven and place on a cooling rack for 10 minutes
Store in airtight containers or parcel them in wraps and distribute as gifts 


Cooks Wisdom
- I used a combination of ghee and butter for these cookies you can go ahead and use only ghee too. Ghee adds a more desi touch to these cookies
- Adding besan flour gives a mithai flavour to the cookie, you can skip it with regular all purpose flour too
- Adding cardamom gives a lovely fragrant cookie
- You also mix the dough with chopped nuts 
- I did not use pure saffron and instead used saffron extract and colour you can dilute saffron in 2 tbsp of milk and add to the cookie dough
- I powdered 1/2 cup granulated sugar and got 1 cup powdered sugar 

Check out variations to Nan Khatai 


Linking this to the Diwali Delicacies event hosted by Priya aks & Sangee also to Vardhini's event Diwali Bash
 photo Plain_White_Background_zps9a662d7a.png
Viewing all 285 articles
Browse latest View live